
Once you’ve scanned in your image, open it directly in Inkscape. Inkscape will put the image in the background of your workspace. Again, it’s not so important that this image be clean, only that the image is clear to you.
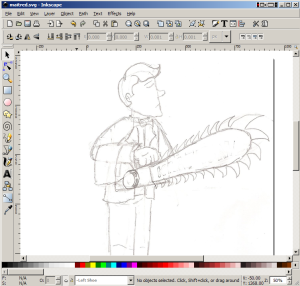
Import your scan into Inkscape
Before you actually start outlining, it’s important that you look over your sketch and figure out how you want to ink it. The beauty of creating each colored area as its own separate shape and using layers is that the various areas of your image are kept separate and stacked on top of each other. Use this to your advantage, and your sketch will be easier to color.
Instead of outlining everything, start by identifying the “base” areasâ€â€that is, areas that are “below” every other piece of the image. For sketches of people, this is usually the skin–clothing and hair go on top of it. When you outline these areas, take particular care on the outside edges. But with the inside edges, you don’t have to be so careful–other pieces that go “on top” of these areas will cover these edges. Once you get your base layers down, you’ll want to start building on top of them with more details.
Once you’ve figured out the order in which you’re going to ink your sketch, you’re ready to start. I generally use the “Bezier curves and straight lines” tool ( ), which makes outlining sketches really convenient. Then, you can adjust those outlines with the “Edit path nodes or control handles” tool (
 ).
).
I’m specifically avoiding a tutorial of basic Inkscape techniques, simply because you’ll likely be able to figure those two tools out without too much effort. And, if you need tutorials, there are probably much better ones elsewhere on the internet. Remember: you don’t need to do anything fancy at this point, you just need to create outlines.
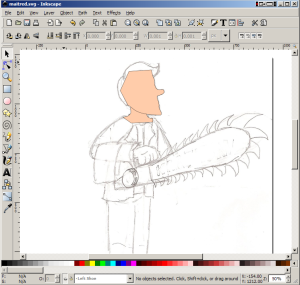
Start tracing your scan
As you go, you should also begin filling in the various shapes you create with solid colors. Don’t spend too much time on this–we’re going to be doing the actual coloring in GIMP. Filling in the shapes in Inkscape is merely a way of helping you visualize what the final product will look like. (Even so, Inkscape is actually pretty powerful in this regard, as you can fill with gradients and such. Still, you’ll find GIMP to be a lot more flexible.)
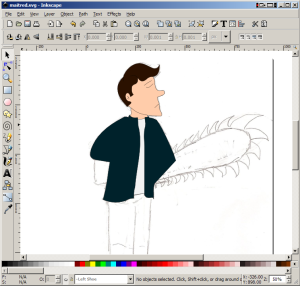
Continue tracing your scan
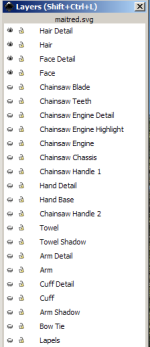
It’s also extremely helpful to make use of Inkscape’s Layers feature (Layers menu > “Layers…” command). It works basically like the layers in Photoshop or GIMP, so if you know how to use them to organize image elements, it won’t be too much of a learning curve. Layering lets you turn elements in your outline off and on, which will better help you visualize the stack of shapes you’re creating. It’s also very useful if you need to reorganize the shapes in your stack.
Once you’re done, save the file as an SVG file.
(As an aside: SVG, or scalable vector graphics, is a common vector file format. It’s Inkscape’s primary mode of saving data, but it’s also readable by several different graphics programs, including GIMP. This means that we’re really not locking ourselves into using Inkscape or GIMP at this point.)