
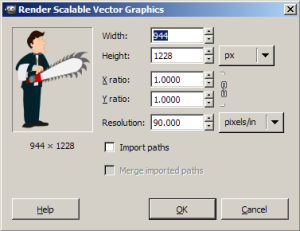
SVG is a common vector file format, and so GIMP comes with out-of-the-box support for it. When you try to open an SVG file, GIMP will prompt you for some options. You’ll want to check the “Import Paths” option in this dialog box.
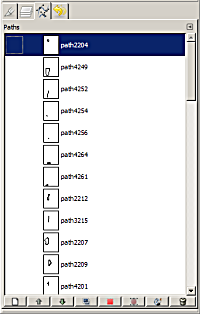
What you get may be a little confusing at first. If you open up the Paths dialog in GIMP, you’ll see every shape or line you drew in Inkscape as its own separate pathâ€â€each with a very generic name like “path2204.” You’ll want to go back through and rename these to something useful, and perhaps even merge ones that need to be in the same path. (For example, I consider the ear detail, the eyes, and the mouth of the Maitre d’ to be “Face Detail.”)
You’ll also see the rendered version of the SVG as its own layer. What we’ll make should look markedly better than this, but you should still keep this layer around for reference.
Once you’ve done that, save it in native GIMP format (.xcf). (If you are using PhotoShop, save it as a .psd.) What we want here is a base file we can use to create our actual artwork. This will tell us where all the lines and boundaries are; we’ll have to actually recreate the borders and shading in GIMP.
Now that you’ve saved a copy, consider what you want to use this sketch for. Scale your image to the appropriate size. If it’s an icon, you’re going to watch to drop down to less than 100 pixels in width and height. If it’s a wallpaper, you’re probably going to want to set it to something that will fit on a 1024×768 screen.
After resizing, I’d recommend saving another .xcf of the file as your working copy. This way, you’re not going to affect the original set of paths as you do work on it, and you’ll be creating an actual image based on the resolution you’re targeting.
For example, I saved my original Maitre d’ image at 944×1228 pixels as maitred.xcf. But this isn’t the size I needed–I needed to create the background for the sidebar, which needs to be around 300 pixels in width. So, I also created a version saved at 300×390 pixels called maitred-300.xcf, which I used for the sidebar background.
As an aside, saving two copies of the file may seem pretty pointless. But we’re really creating a master copy and a working copy–that way, if we need to come back and redo the sketch at a different size, it’s easier to do.